Friday, January 27, 2012

Recipe: Healthy Cheese Sticks

What? Healthy cheese sticks!?! It's a miracle!

Or so Miss Lizzie thought when she saw this pin on Pinterest:


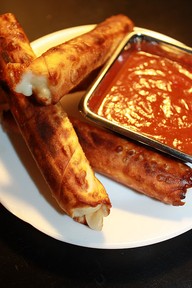
Mmmmm, looks freaking delicious. The recipe can be found over at Olive the Ingredients, where you can also find other tasty things that are actually semi-good for you. Very simply, the idea is to just wrap up mozzarella cheese sticks into won ton wrappers and bake them.


Oh, snap.

Apparently, some things are easier said than done...


Hehehehe, here's what Miss Lizzie herself had to say about this fabulous specimen of a recipe fail:

" These are dangerously melty. Don't let even the tiniest spot of cheese see the light of day when you wrap them, or else that cheese will end up all over your baking sheet (NAILED IT). They taste pretty good, not like actual mozzarella sticks but like viable alternatives. Next time I'm definitely adding some Italian seasoning or something, at the very least some basil, because they do literally just taste like a cheese stick in a wonton wrapper. That is not the taste explosion I had hoped for. In the end I give this recipe a B+, my attempt at it a C, and my predicted future success with it an A-."


Don't forget!! You can submit your own Pinter-fails to this blog (and we're just dying to see them)! We're also taking PinWins, so if you totally pwn'd a craft or a recipe, take a pic and send it in!!

Thursday, January 26, 2012

Project: Toilet Humor

Right off the bat, dear followers, I have to apologize for the lack of posts this month!!! Things have gone what I would be happy to call haywire. Busy, busy!!

Since I know many of you are busy people as well, I thought you all might enjoy this craft I made for my husband. It's very simple, and takes only a few minutes to complete!!

You'll need a fresh roll of toilet paper, and a pen that won't bleed through, but also won't tear the toilet paper.


SERIOUSLY. PUT THE TOILET PAPER BACK ON THE DAMN ROLL.

Thursday, January 12, 2012

Perspective...

I had to die of laughter when I saw this pin:


Finally. A man who can appreciate this:


Yep. That's where we're supposed to eat dinner.
CRAFT ON!!!

Monday, January 9, 2012

Recipe: Hershey Kiss Pretzel M&M Bites

The lovely Miss Lizzie has attempted the much-pinned Hershey Kiss Pretzel M&M bites! As always, the recipe was found on Pinterest, but originates from Megster Meter where tons of other delicious looking things can be found.

The recipe was super easy and everything was done just the way it is described on the blog, except that peanut M&M's were used instead of regular ones. Here is what they are supposed to look like:


Super cute! My favorite part is that they're little individual servings, and there's so little mess involved! She made two kinds - one batch with Hershey Kisses, and one with Rolos (which are sooooo good anyway). Here's how they turned out (Rolos at bottom of pic, Kisses at top):


OMGosh! Total PIN WIN!!! Not only do they look perfect, but I got to taste-test them first hand and they were just as delicious as they were cute! This is such a great snack-y thing to serve at any get together, I'll be trying these next time I throw a party!

Tips for Hershey Kiss Pretzel M&M Bite Success:

1. If you make the kind with Rolos, try subbing Reece's Pieces for the pecans - it was super good!!

2. It is VERY IMPORTANT to get them in the fridge or else they take forever to cool. If you can, try and plan ahead to have space in the fridge to put the whole baking sheet in there to cool since they're a bit too melty to scrape off of the baking sheet right away.

3. The Rolo recipe is just slightly different than the Hershey Kiss recipe. Get it at So Wonderful So Marvelous.

If you try this recipe, we'd love to see your pictures!!

Thursday, January 5, 2012

Recipe: Champagne Cupcakes

Hooray for the first recipe attempt of this blog!

The lovely Miss Lizzie threw a super-classy New Year's party and we decided it would be just oh-so-perfect if we made the Champagne Cupcakes for the party since everyone would be drinking anyway! She originally found the recipe on Pinterest, but the recipe originates over at Sprinkle Bakes, where you can find other super great things. Here's what the cupcakes are supposed to look like:


Super pretty!! Not to toot my own trumpet, but I'm a pretty good baker. However, this was my first attempt at putting filling inside a cupcake so I was a bit nervous. The recipe requires three different mixtures:


So far, so good. I did manage to make 24 cupcakes from the recipe, but they were a bit on the small side, so next time, I'll probably stick to making the suggested 17 instead. Each one of the parts tasted supremely good though, the batter was tasty, the filling was tasty, and the icing was to die for!

After my cupcakes were thoroughly cooled, I used a small paring knife to literally cut a hole in the top middle of the cupcake. Doing the filling was a lot easier than I thought!! After inserting the filling, you just cut the excess cake off the piece you removed to create a little lid to put back on top of the filling. As a side note, I put the filling in a Ziploc bag and cut off a tiny bit of the tip for less mess and easy filling action.


So, while the frosting was very, very tasty, mine was no where near as fluffy as the one in the picture.


Ok, not as pretty necessarily as the one from Pinterest, but they tasted soooooo darn good!!! They were a huge hit at the party so I'm calling this one a draw! Appearance wise, total recipe fail. Taste wise, this recipe is going into my permanent collection!


Tuesday, January 3, 2012

Project: Glitter Paint Glasses

Happy New Year, Dear Followers and Readers!!

I thought it would be appropriate after this past New Year's weekend to show you all how my glitter paint glasses project turned out. I tried to do some champagne flutes in preparation for the holiday and here's what happened...

I found the project on Pinterest, but the craft originates over at Martha Stewart's site (Damn you, Martha!!!) and looks just gorgeous:


Seems simple enough! Just tape off and paint the glasses. Got it.

I used blue painters tape cut into thin strips to tape off a nice pattern and like the ones on Martha's site, I did 4 pink ones and 4 gold ones. The project was a disaster right from the get-go. The first round of glitter paint hardly looked like I had done anything but fog the glass up. It was clear that multiple coats would be necessary to get the full glitter effect.

Unfortunately, my blending skills are apparently a bit rusty. I had higher hopes for the ones I taped a stripe on, since it seemed like the paint was coating a bit better.


Yeah. The paint peeled off right with the tape.

Here is the "finished product."


Now I have a bunch of hideous champagne flutes I have no idea what to do with.
We'll just mark this as my second craft implosion on the site, and the first craft implosion of the year!!